Deploy
Follow the steps below to deploy the UXM Desktop Agent, latest software can be downloaded from https://download.uxmapp.com/windows/latest/
Installation methods
You can install the UXM Endpoint agent in different ways, depending on your needs:
- Deploy UXM Desktop agent via Intune (or other deployment tool like SCCM, Jamf)
- Install it manually and manage upgrades manually.
Settings are configured via Group Policies (GPO) and fallback to MSI install parameters if GPO's isn't set or not supported. (Windows Home Editions)
Prerequisities
See requirements here.
Packages
The agent is available in MSI, EXE and from the Microsoft Store, it's recommended to use the Microsoft Store for auto-updates or deploy the MSI when new UXM Desktop agents are released.
Please note that old EXE installer have to be uninstalled first if deployed, there is currently no migration path from EXE to MSI installer or Microsoft Store, the MSI installer is mainly used for new customers that haven't deployed the EXE installer via SCCM.
| Package | x86 | x64 | Auto-updates on new releases | Comments |
|---|---|---|---|---|
| UXM_Desktop_Agent_x64_YYYY.MM.DD.msi | N/A | Yes | No | |
| UXM_Desktop_Agent_x86_YYYY.MM.DD.msi | Yes | N/A | No | |
| Microsoft Store (MSI) | Yes | Yes | Yes | See Microsoft Store Link |
| UXM_Desktop_Agent_x64_YYYY.MM.DD.exe | N/A | Yes | No | Can give issues with locked files if deployed via tool that upgrade while user is logged into machine. (SCCM/Intune) |
Configuration
Group Policies (GPO's)
It's recommended to use Group Policies (GPO's) to control the UXM Desktop Agent settings, if no Group Policy settings is found the agent will fallback and use the settings configured via install parameters.
https://download.uxmapp.com/windows/UXM_Desktop_Agent_Group_Policy_Templates_v1.zip
Install parameter options
Example on default parameters, replace {Agent Key} and {Collector} with the information received by your account manager (browser extensions is normally deployed via GPO's, but can be force installed if no Group Policy tool is used):
- MSI
- EXE
- Microsoft Store
msiexec /i UXM_Desktop_Agent_YYYY.MM.DD.msi /qn /norestart /l*v! "filename" AGENT_KEY={Agent Key} COLLECTOR={Collector} ENABLE_UI_PLUGIN=true ENABLE_EDGE_PLUGIN=false ENABLE_CHROME_PLUGIN=false FORCE_ACTIVATION=false
| Argument | Value |
|---|---|
| AGENT_KEY= | Agent Key generated when Splunk App is configured. Is used for extra security and to prevent customs on same SaaS solution to be able to access other customers data. |
| COLLECTOR= | UXM collector url that data is send to, has to be http:// or https://, both IP and DNS can be used. HTTPs requires that you use DNS and have a valid HTTPs certificate on the Splunk server / Reverse Proxy. Use https://customername.uxmapp.com if hosted on our SaaS solution. |
| VERIFY_HTTPS= | true: Will verify HTTPs connection and server certificate. Valid HTTPs certificate has to be installed on Splunk server / Reverse Proxy. false: Ignores HTTPs certificate warnings. |
| PROXY_AUTO_DETECT= | true: Will look through all users on the PC and use the first proxy setting it finds. false: Will use proxy settings supplied below. |
| PROXY_SERVER= | Proxy server |
| PROXY_PORT= | Proxy port |
| PROXY_USER= | Proxy user if proxy server requires authentication. |
| PROXY_PASSWORD= | Proxy password if proxy server requires authentication. |
| PROXY_AUTOCONFIG_URL= | JavaScript file that can return different proxy servers depending on host. Example: <http://172.21.1.25:888/proxy.pac>More info: <https://en.wikipedia.org/wiki/Proxy_auto-config> |
| CA_CERTIFICATES_FILE= | Path to custom ca-certificates.crt file to use, this file contains Root CA authorities.You will need to add your own CA certificate to the file, if you are using custom certificates. |
| SYNCHRONIZE_EACH_MIN= | How often new/updated profiles are downloaded from the Splunk collector server. Default is every 60 minutes, only new and updated profiles is downloaded. |
| ENABLE_UI_PLUGIN= | Enable Desktop UI monitoring plugin, launches PCAgentUI.exe process for each user session on the PC. (For monitoring clicks and events inside monitored programs) |
| ENABLE_CHROME_PLUGIN= | true: Install Chrome extension to get measurements from monitored Websites. false: Chrome extension won't be installed by UXM Desktop, you can deploy it via GPO's if your enterprise deploys Chrome extensions this way. (Recommended) |
| ENABLE_FIREFOX_PLUGIN= | true: Force Firefox addon to be installed to get measurements from monitored Websites. Not working since Firefox 74, see <https://blog.mozilla.org/addons/2020/03/10/support-for-extension-sideloading-has-ended/>false: Firefox addon won't be installed by UXM Desktop, deploy via ESR. |
| ENABLE_IE_PLUGIN= | true: Installs Internet Explorer BHO addon to get measurements from monitored Websites. false: Internet Explorer addon won't be installed. |
| FORCE_ACTIVATION= | true: Force the Chrome extension and Firefox addon to be loaded, users won't be able to disable the plugins. false: Users will be asked to accept the extensions, see following guides on how the extensions can be pushed via GPO's. Distribute UXM Web Chrome extension to nodes Distribute UXM Web Firefox addon to nodes |
| /i | Specifies normal installation. |
| /x | Uninstalls the package. |
| /silent | Instructs setup to be silent, silent, will show an progress UI. |
| /qn | Instructs setup to install very silent where no UI or questions is asked. |
| /norestart | Prevents Setup from restarting the system following a successful installation, or after a Preparing to Install failure that requests a restart. |
| /l*v! "filename" | Causes Setup to create a log file, and allows you to specify a fixed path/filename to use for the log file. |
UXM_Desktop_Agent_YYYY.MM.DD.exe /verysilent /norestart /closeapplications /agent_key={Agent Key} /collector={Collector} /log /enable_ui_plugin=true /enable_chrome_plugin=false /enable_firefox_plugin=false /force_activation=false
| Argument | Value |
|---|---|
| /agent_key= | Agent Key generated when Splunk App is configured. Is used for extra security and to prevent customs on same SaaS solution to be able to access other customers data. |
| /collector= | UXM collector url that data is send to, has to be http:// or https://, both IP and DNS can be used. HTTPs requires that you use DNS and have a valid HTTPs certificate on the Splunk server / Reverse Proxy. Use https://customername.uxmapp.com if hosted by MCG on our SaaS solution. |
| /verify_https= | true: Will verify HTTPs connection and server certificate. Valid HTTPs certificate has to be installed on Splunk server / Reverse Proxy. false: Ignores HTTPs certificate warnings. |
| /proxy_auto_detect= | true: Will look through all users on the PC and use the first proxy setting it finds. false: Will use proxy settings supplied below. |
| /proxy_server= | Proxy server |
| /proxy_port= | Proxy port |
| /proxy_user= | Proxy user if proxy server requires authentication. |
| /proxy_password= | Proxy password if proxy server requires authentication. |
| /proxy_autoconfig_url= | JavaScript file that can return different proxy servers depending on host. Example: <http://172.21.1.25:888/proxy.pac>More info: <https://en.wikipedia.org/wiki/Proxy_auto-config> |
| /ca_certificates_file= | Path to custom ca-certificates.crt file to use, this file contains Root CA authorities.You will need to add your own CA certificate to the file, if you are using custom certificates. |
| /synchronize_each_min= | How often new/updated profiles are downloaded from the Splunk collector server. Default is every 60 minutes, only new and updated profiles is downloaded. |
| /enable_ui_plugin= | Enable Desktop UI monitoring plugin, launches PCAgentUI.exe process for each user session on the PC. (For monitoring clicks and events inside monitored programs) |
| /enable_edgechromium_plugin | true: Install Edge Chromium extension to get measurements from monitored Websites. false: Edge Chromium extension won't be installed by UXM Desktop, you can deploy it via GPO's if your enterprise deploys Edge extensions this way. (Recommended) |
| /enable_chrome_plugin= | true: Install Chrome extension to get measurements from monitored Websites. false: Chrome extension won't be installed by UXM Desktop, you can deploy it via GPO's if your enterprise deploys Chrome extensions this way. (Recommended) |
| /enable_firefox_plugin= | true: Force Firefox addon to be installed to get measurements from monitored Websites. Not working since Firefox 74, see <https://blog.mozilla.org/addons/2020/03/10/support-for-extension-sideloading-has-ended/>false: Firefox addon won't be installed by UXM Desktop, deploy via ESR. |
| /enable_ie_plugin= | true: Installs Internet Explorer BHO addon to get measurements from monitored Websites. false: Internet Explorer addon won't be installed. |
| /force_activation= | true: Force the Chrome extension and Firefox addon to be loaded, users won't be able to disable the plugins. false: Users will be asked to accept the extensions, see following guide on how the extensions can be forced. Distribute UXM Web Chrome extension to nodes Distribute UXM Web Firefox addon to nodes |
| /dir | Directory to install agent in, for example: D:\Program Files\Systemslab\UXM Desktop Agent |
| /silent | Instructs setup to be silent, silent, will show an progress UI. |
| /verysilent | Instructs setup to install very silent where no UI or questions is asked. |
| /norestart | Prevents Setup from restarting the system following a successful installation, or after a Preparing to Install failure that requests a restart. |
| /closeapplications | Instructs Setup to close applications using files that need to be updated. (PCAgent.exe, PCAgentUI.exe, Internet Explorer, Chrome) |
| /log | Causes Setup to create a log file in the user's TEMP directory. |
| /log="filename" | Same as /LOG, except it allows you to specify a fixed path/filename to use for the log file. |
No parameters exists, agent will use settings from GPO's.
Deploy via Intune
Create Group Policy configurations
-
Download and unzip the Group Policy Templates from: https://download.uxmapp.com/windows/UXM_Desktop_Agent_Group_Policy_Templates_v1.zip
-
Open https://intune.microsoft.com/ and goto Devices -> Windows -> Configuration
-
Click Import ADMX
-
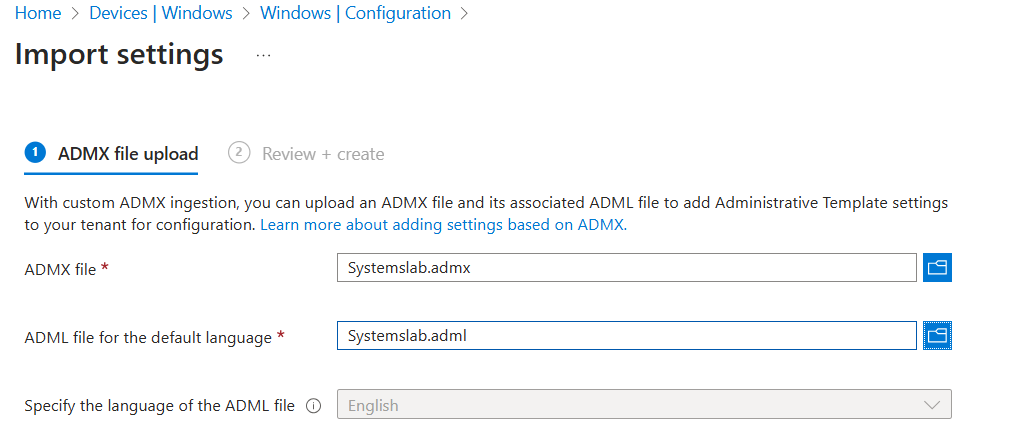
Click Import button and select the admx/Systemslab.admx and admx/en-US/Systemslab.adml file from the unzipped Group Policy Templates.
-
Click Import button again and select the admx/UxmDesktopAgent.admx and admx/en-US/UxmDesktopAgent.adml file from the unzipped Group Policy Templates.
-
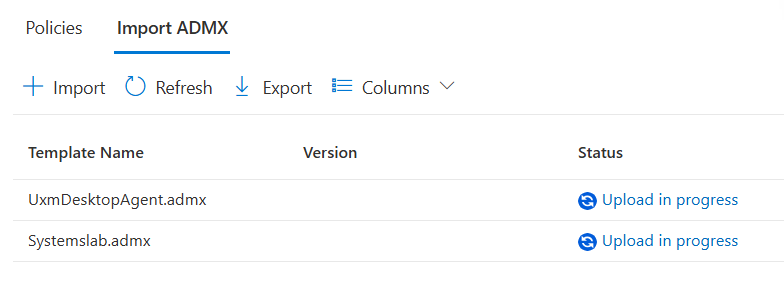
Wait 5 minutes for the templates to be deployed and listed as Available
-
Goto Polices page
-
Create -> New Policy
Platform: Windows 10 and later
Profile type: Templates
Template Name: Imported Administrative templates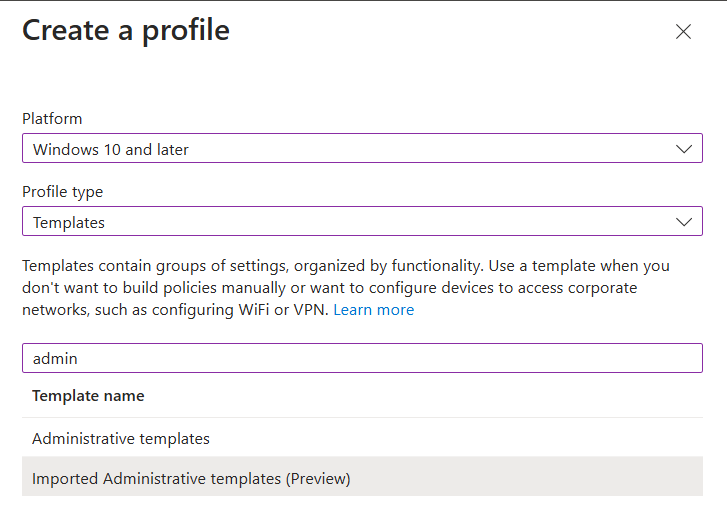
-
Basics: Fill out name and description
Name: ADMX: UXM Endpoint Agent
Description: Settings for UXM Endpoint Agent -
Configuration settings
Expand Systemslab -> UXM Desktop Agent under Computer Configuration, if the policy isn't available it can help to skip this step, create the profile and edit it again afterwards, then the policies will appear.
Agent Key: Agent Key provided by account manager or from Heavy Forwarder -> uxmapp -> Set up if hosted On-Premise.
Collector: Enter the IP or DNS of the UXM HF collector, a valid HTTPs certificate is required on the collector if you want to use HTTPs. For SaaS solutions use https://customername.uxmapp.com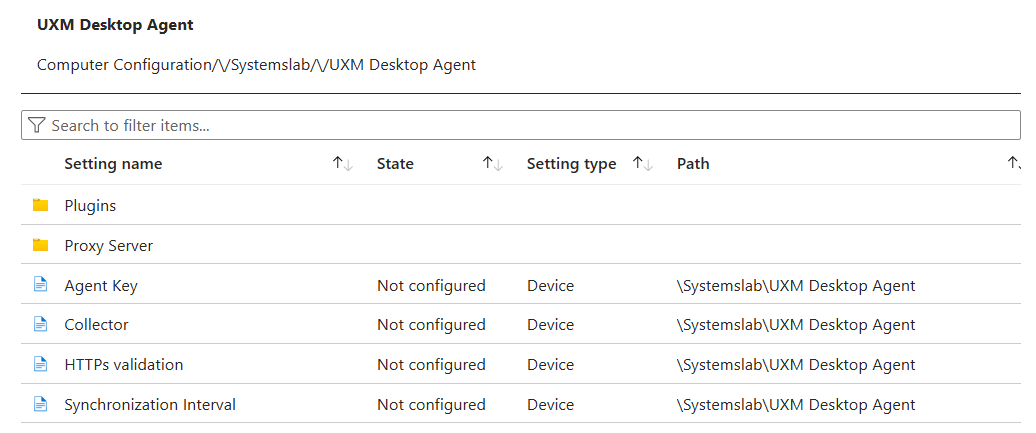
-
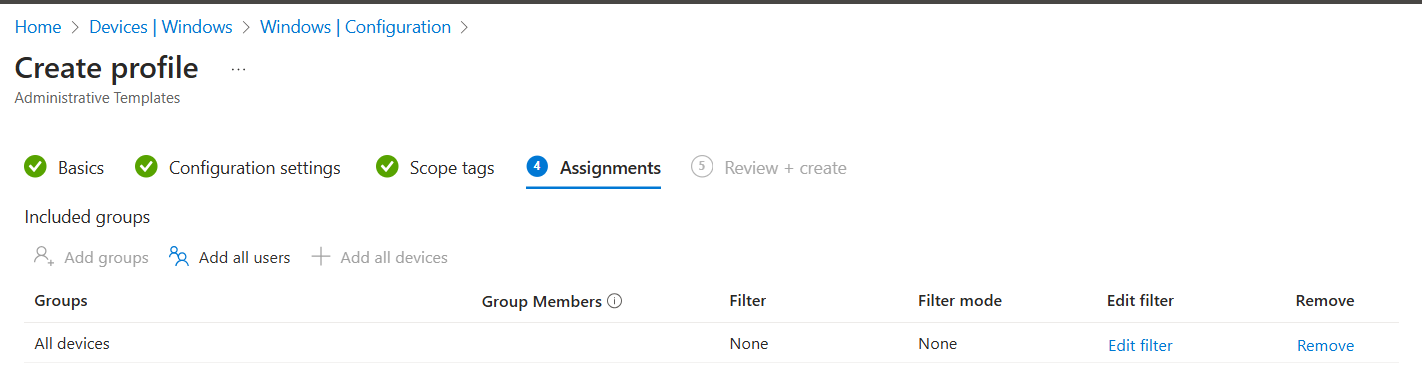
Assignments:
Select all devices to deploy to all Windows machines enrolled in Intune or add filter for limited rollout.
-
Review + create: Press create to deploy configuration file
Deploy package
- MSI
- EXE
- Microsoft Store
-
Open https://intune.microsoft.com/ and goto Apps -> Windows
-
Click Create and select Store App -> Line-of-business app type
-
Select MSI package file
-
App information:
Enter Publisher Systemslab ApS and press Next
-
Assignments:
Select all devices to deploy to all Windows enrolled in Intune or add filter for limited rollout. Click Next
-
Review + create: Press create to deploy app
Intune deployment from EXE files is not possible.
-
Open https://intune.microsoft.com/ and goto Apps -> Windows
-
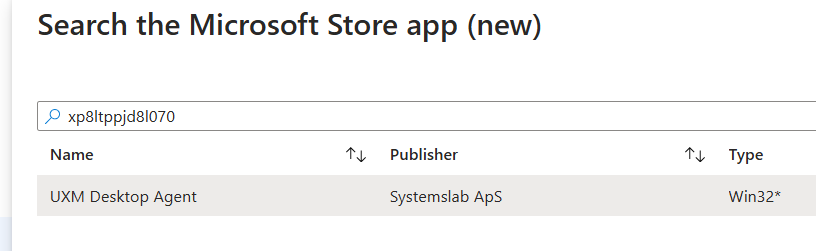
Click Create and select Store App -> Microsoft Store app (new) app type
-
Search for ID xp8ltppjd8l070 select and press Select button
-
App information: Accept details and press Next
-
Assignments:
Select all devices to deploy to all Windows enrolled in Intune or add filter for limited rollout. Edit toast notifications to hide all and enable restart grace period. Click Next

-
Review + create: Press create to deploy app
Monitor rollout
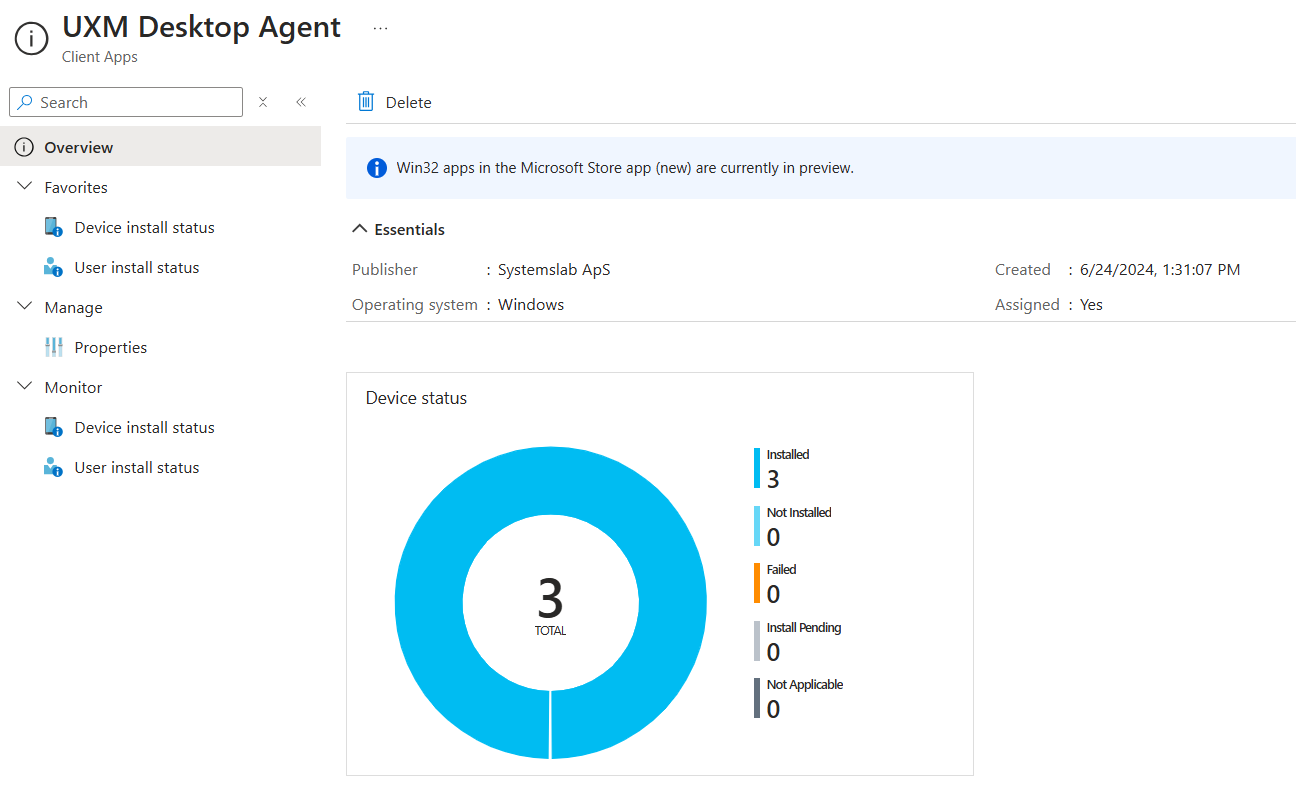
Open the Client app in Intune to see how many devices the agent is rolled out to, they will be available in UXM if Group Policy configuration is correctly deployed.
Install manually
See Installing Desktop Agent Manually
Or use the install parameter and generate your own installation command like the following example:
- MSI
- EXE
- Microsoft Store
msiexec /i UXM_Desktop_Agent_YYYY.MM.DD.msi /qn /norestart /l*v! "install.log" AGENT_KEY={AgentKey} COLLECTOR=https://customername.uxmapp.com ENABLE_UI_PLUGIN=true ENABLE_CHROME_PLUGIN=false ENABLE_FIREFOX_PLUGIN=false FORCE_ACTIVATION=false
UXM_Desktop_Agent_YYYY.MM.DD.exe /verysilent /norestart /closeapplications /agent_key=TR32AD87 /collector=https://customername.uxmapp.com /log /enable_ui_plugin=true /enable_chrome_plugin=false /enable_firefox_plugin=false /force_activation=false
Upgrading agent
- MSI
- EXE
- Microsoft Store
The agent will reuse old settings or receive settings from GPO and can be upgraded with the command:
msiexec /i UXM_Desktop_Agent_YYYY.MM.DD.msi /qn /norestart /l*v! "install.log"
The agent will reuse old settings or receive settings from GPO and can be upgraded with the command:
UXM_Desktop_Agent_YYYY.MM.DD.exe /verysilent /norestart /closeapplications /log
Package auto updates when new releases are available on the store.
Troubleshooting issues
Log files are stored under %PROGRAMDATA%\Systemslab\UXM PC Agent\Logs, the support team will need these if there are any issues with the agent.
It can also be nessesary to enable debug logging, this is done by editing the files C:\Program Files\Systemslab\UXM Desktop Agent\PCAgent.properties and C:\Program Files\Systemslab\UXM Desktop Agent\PCAgentUI.properties and setting the level to debug, a restart of the UXM Desktop Agent services is needed afterwards.